Sunday, September 29, 2013

I'm Hanging Up My Hat

Yup. I am hanging up my hat. Not on this three week old blog thing, I'm hanging up my actual hats, but we'll get to that in a minute.

Dear Super Organized People of the World,
Teach me your ways please. And I will bake you some cupcakes.
XO, Goldie

I get into organization in (very short) spurts and try to fix everything in the course of one morning. I know it's completely ridiculous but it's the way I work. So yesterday morning, feeling like I could conquer the world, I cleaned out two drawers. I know, how completely not news or blog worthy, but peeps, this is huge for me. So I decided to tackle an extremely small project I've been ignoring for awhile. (Note to self: it's bad to ignore the things that you already have all the supplies for)

Last summer I used some Command hooks to hang up my long necklaces next to my dresser. It keeps them neat,organized, untangled, and then I end up wearing them more often. This system has been working great for me so I decided to do the same thing for my hats.

I realized I have amassed quite a few fedoras after they kept falling down on me every time I opened my closet door. I used a small corner of the room that's hidden behind a piece of furniture because I wasn't intending this to be decor, it was strictly for a functional purpose.

Get ready for the most boring before picture you have ever seen:

 
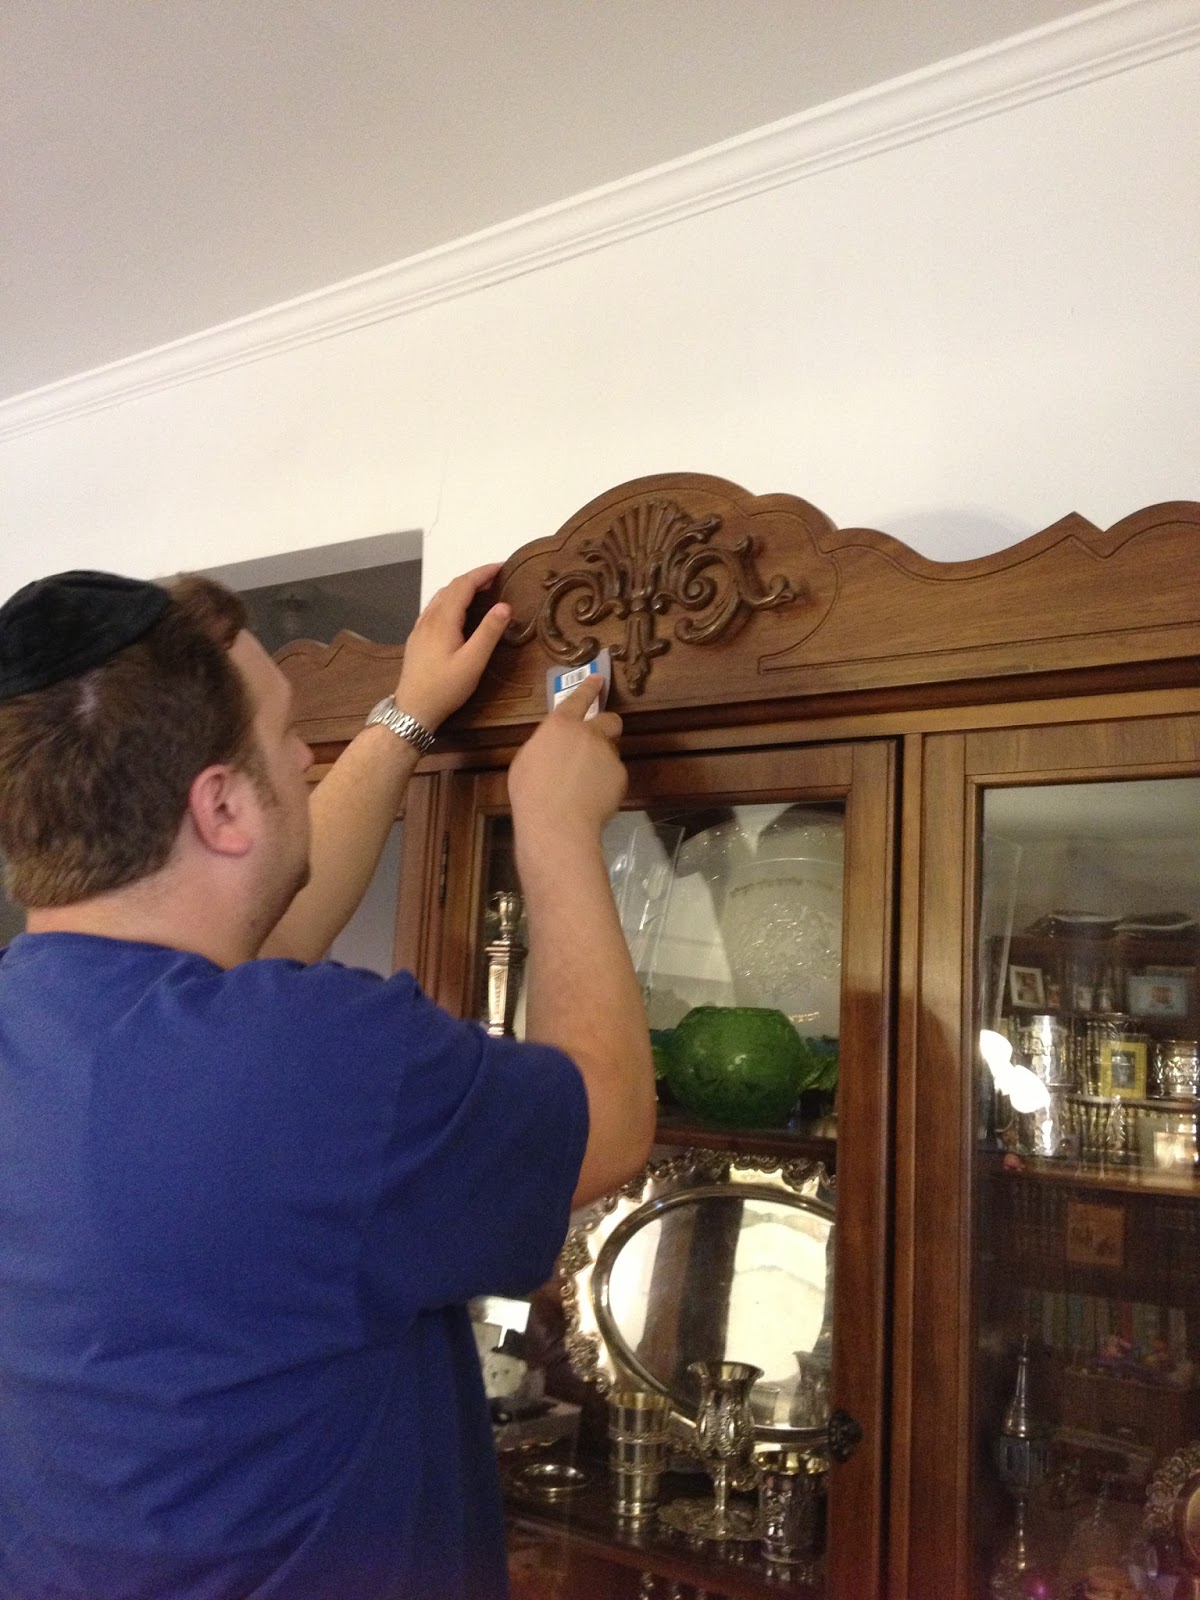
With a little help from these babies (and my attempt at Vanna White), a blank white wall can become something useful.

 
We end up with this:


Holla! Low key organizational project that takes a total of five minutes but makes a huge difference.

So who's organizing what lately? Or if you're an organizational goddess shoot me a comment below and help me become you! And now I have to go deal with the 400 pictures sitting on my desk that are waiting to be put in order and into albums...

Monday, September 23, 2013

Weekend Recap

This weekend was the epitome of perfect fall weather. I'm a summer girl but I'm finding myself, well, falling for fall this year in a big way. Perfect days with my family are definitely making it super easy for me to be crushing on this season.

In the land of perfectly set up edited blog photos (oh hey welcome to my corner of the internet, we don't have that here), facebook, and instagram, it seems like perfect days don't happen if there weren't perfect photos capturing them. But here are some not so great (my camera died on me about three minutes into our trip, thank you for standing by me, iphone) pictures of a spectacular day out with the fam.

We went to a small amusement park where both Moshe and Lily could not get enough of the rides.


Lily said horse for the first time! But then decided she didn't really like sitting on one, and hung out with Daniel on the bench for the rest of the ride.


Pure joy on top of the Ferris Wheel. Makes a mama's heart super happy.


We capped off our perfect weekend with a little spa treatment for Miss Lily Boo. Pedis for toddlers, totally normal right?

Who else is loving this glorious fall?

Monday, September 16, 2013

Just Do It: Part II. Or: “How To Paint Furniture”


Here is my promised, step by step, instructions on how to paint furniture. I want to remind you that if you put your mind to it, you really are capable of doing this, don’t be scared and just dive in and you will be amazed by the results.

{For the four people that read this blog, one of you has already lived through this in picture texts in real time, so to my dear therapist T, thank you, I love you, and feel free to skip this post.}

All right, so let’s get in to the spectacular details. I used these instructions from John and Sherry of Young House Love, my King and Queen of DIY. They are awesome, everything they touch is awesome, and I figured if it worked for them it will (hopefully!) work for me. And ladies and gentleman, it worked. So it will work for you too. Read these instructions, grab a paintbrush and some ugly furniture and just do it!

A reminder of the ugliness we were starting with:


Step One: Picking a paint color.

I’ve actually had a few people ask me to help them pick paint colors recently, because they thought I would be good at it. Colors are a personal preference but there is definitly a right way of doing it. Like starting any project, picking a color can be very scary because you don’t want to make a mistake. My biggest advice to anyone while picking a color is to get the paint chips and bring them home with you! Don’t make any decision right in the store, because the color you are seeing there will look COMPLETELY different in your own home. I made this mistake in my first apartment and ended up with a light blue accent wall that was supposed to be grey. Years later, and still a grey lover, at the start of this project I got some different grey tones, brought them home, taped them up, and then stared at them for a day or so.


I asked Moshe, my five year old, which color he liked best. To which he replied, “These are not colors, they are all grey and black.” In the end, Daniel and I landed on a color we loved without Moshe’s help. It’s not one of the paint chips in the picture above because I actually went to Lowe’s for a second round of chips after not loving any of the Sherwin Williams colors above. The color I chose was Eddie Bauer Home’s Vintage Grey (using Valspar paint.)

Step Two: Removing hardware, and using wood filler.

There were just so many ugly things that were wrong with this breakfront. The pulls on the bottom piece had an extra metal plate screwed into the cabinets which made it look clunky and super outdated. The top piece had an elaborate wood carving that I really couldn’t stand.


You can also see how badly damaged and chipped the wood was in this picture. But don’t worry we’ll be fixing that at the end of this step.

 Anyone else see a terrifying owl in this? No it’s just me? Ok moving on…

I unscrewed the  of the cabinet pulls and then used the back of the hammer to get the tiny screws out of the metal plate that was still stuck on the cabinet. When that piece was off, it was already looking better.

My amazing 6’3” husband took care of the demented owl part. He stuck a spackle knife under the wood and then yanked as hard as he could until it came off. A word of caution: It came off in a few flying pieces so it would probably be wise to wear protective eye gear for this step. (Look Mom! I’m telling people to be safe so they don’t end up in the hospital like moi. I hope you’re proud!) There were nails sticking out of the furniture from the inside, that he pulled out with pliers.


Once all of the hardware and decorative wood was off, I was left with a lot of holes to patch. The breakfront was also chipped in some spots, so this is when wood filler comes in and saves the day. I used Elmer’s ProBond Professional Strength Woodfiller. Using a spackle knife, you just apply some of it in your holes or chips and allow it to dry. You then sand it down, and it’s like there was never anything wrong with the wood. Magic, I tell you.

Step Three: Sanding.

Many people say that sanding is the worst part of a project. I am going to respectfully disagree with all of you people. The worst part of a project is actually cleaning up the sanding job. Really. It’s terrible. I spent an entire afternoon sanding the bottom part of the breakfront by hand. My arm was very sore after but I felt so accomplished. Until my brother in law came over that night to help us get the breakfront out onto our covered porch were I was going to be doing the paint job. He knows a thing or two about DIY, and apparently my sanding didn’t really do anything because I didn’t put enough oomph into it. My very sore arm and I were extremely sad. Said brother in law ended up saving the day because he had a hand sander that I borrowed which made the job much easier and faster. Especially because Daniel ended up doing the sanding because the vibrations from the machine made my (very weak?) arms feel not so great. This is also a step where goggles and a mask are advisable. I used 80 grit sandpaper for this step. I found cleaning up all the sawdust to be an extreme pain and felt like no matter what I was doing it was never going to be clean. I ended up using a tack cloth (whick is a sticky piece of fabric that grabs on to the dust) and it really helped. When your newly sanded furniture is squeaky clean, you’re ready for the next step.


This picture is after my hand sanding job. The machine does a better job of prepping the wood.

Step Four: Priming

Using a brush or a roller (I used a combo of both) Cover your entire piece of furniture in a THIN layer of oil based primer. I used Kilz. Surprisingly, I have nothing else to say about this step, so moving on to the main show:


 Step Five: Painting.

Using latex based paint, and a brush or roller, paint two (or three if needed) THIN coats of paint. You need to leave 2-4 hours of drying time in between coats. For the grey I did two coats, but the inside needed three coats of white for even coverage. There comes a point where you really just want to just throw down your roller and be done painting, and to see the finished product, but don’t give up and just continue rolling those thin coats of paint.

I also added a dipped legs affect by using painters tape and painting the legs and bottom part of the breakfront silver. It’s a little hard to see in the pictures, but this is one of my favorite parts of the makeover.


 Step 6: New Hardware

This is just the putting everything back together step. We needed to reattach the doors and put on some new hardware. I got mint green glass knobs from Anthropologie which I am completely in love with. They really helped make everything be more modern and clean looking. Sometimes it’s ok to splurge on overpriced knobs. Especially when your furniture was free to the free-o.


Since I did the painting on my porch, I had the help of some of our really awesome friends/neighbors who assited Daniel with dragging this heavy piece of wood in and out, which is something I was really not capable of doing. I did these steps from start to finish on the two pieces of the breakfront separately, until I got to put them together to see the final result. When the top was finally finished and ready to come in, we somehow got a really awesome friend to come over here at 10:30 pm to help with the moving. His wife is a night shift nurse and was working that night, so I went over there to watch their kids, and he came here to do the heavy lifting. They probably don’t know why they ever became friends with us, but thanks guys, we really appreciate it.

Putting everything back together and staring at your masterpiece is a really awesome feeling. Lily would walk by the newly painted furniture and yell “YAAAY!” the first day it was back inside, so it was great that even the littlest one around here liked how it turned out. And I may have a tiny DIY partner in the making.


Have I convinced anyone that they’re capable of doing this? Any questions just leave a comment below and I can hopefully help you out!

Wednesday, September 11, 2013

Stylin It: Big & Little


Does anyone else out there get super excited when they receive a shipping confirmation in their inbox and then track the package obsessively? I watch my package travel across the country and then even though I know what day it will be there, I am so happy to see it outside my door.

Shopping for my kids makes me happy too. The little people in my family make everything look so cute and it’s hard not to just go crazy and buy everything in sight. My five year old son, Moshe, is a pretty awesome kid. {I highly recommend having a boy first because everyone could use a big brother in their life.} When he was little I worked so hard finding accessories for him like sunglasses, hats, and belts, while my mama friends with baby girls got to just stick bows in their baby’s heads and call it a day. If I may say so, Moshe rocked it (and he still does). And then I got my girl. Lily is now 20 months and I got to join the big bow club. And the dresses club. And the bracelets, earrings, and pretty in pink club. Shopping for a little girl is just fantastic.

A few weeks ago, I went on a bit of a shoe buying spree for Miss Lily Boo. It was the first time I went shoe crazy for her, in the summer she lived in her Saltwaters, and before that she had her first (and only) pair of shoes. After tracking the cross country journey of one of the shoes I ordered for her, I found a stunning box sitting at my door. (Pretty packaging really does make such a difference!) And when I opened it, I found this:

 
Cinderella, you are so right.

After starting our little shoe collection, I realized that my taste in shoes for Lily is pretty similar to my taste in shoes for myself… So one day she will probably hate me for this, but we have started sporting some similar looks:

low top Converse for both of us

leopard flats and leapord oxfords

But then I realized I didn’t stop at matching footwear with only my baby girl, I was doing it with my little man as well:

high top black kicks for mama and Moshe

It's madness, but I don't think I'll be able to stop. Now if I could just find some yellow Mary Jane’s for myself…

Am I the only mama out there rocking similar shoes to their kids? Let me know below!

Monday, September 9, 2013

Nike Told Me To Just Do It


Sometimes (all the time?) jumping into a project can be a little frightening. And sometimes, it takes six (!!!) years to actually decide you can do it. Or maybe that’s just me.

Say hello to this super bit of ugly furniture.


This guy came into my life right after my husband, Daniel, and I got married. It had seen better days, it was not my style at all, and the door always stuck a little when you tried to open it, but it was free. And free is what made two newlyweds take it home. Even though it was super hideous, I remember putting the one pretty thing we owned right in the middle and just staring at it, happy that we were starting to decorate our little apartment. About a year later I found myself immersed in the world of decorating magazines and blogs and seeing amazing makeovers of furniture and spaces. I can’t say I really fixed anything back in our first home. Looking back at the decorating decisions I made then let’s just say I’m glad nothing is permanent.

We moved to our next apartment and I had a fresh start to decorating. My style lightened and brightened up a lot and I started to do bigger projects. I painted a very small dresser for my son and upholstered the headboard in the master bedroom, I was making things prettier and gaining some confidence. But I still didn’t think I was capable of tackling this ugly beast.

Side confession: I watch some really bad TV. And one day while watching 16 and Pregnant I actually see my hideous breakfront in one of the girl’s homes. And yes, I did pause it so I can take a picture. I’m not saying you can’t have good taste and be a teen mom but this show was not helping my breakfront’s reputation at all. Plus, I knew that it was actually uglier in person.

I even saw my same exact breakfront on this blog.
She had painted it all white and while it was definitely an improvement, I thought I would take the makeover a little further and add a different color on the inside and some gorgeous new hardware. Except I still didn’t think I had the DIY skills to actually do it.

This summer I decided to stop being a coward and just do it. It couldn’t possibly look worse when I was done with it, than what it looked like already. Some key players in my life were super supportive and a big reason I finally decided to try my hand at redoing the breakfront. Daniel had been trying to convince me to write a blog for a pretty long time. But then he said he’s was just going to beat me to it and start his own blog called “Crap, My Wife Is Doing Another Project” because all of my ideas tend to lead to more work for him. But he’s a super awesome guy and was my head cheerleader and right hand man through the makeover. I also had a really awesome friend acting as my therapist and giving advice and encouragement.  In the end by breaking it down into little pieces it didn't seem so unmanageable. It took a long time but was so worth it. A little paint and new hardware goes a long way in changing a piece of furniture and making it more you. I’m going to write a step by step how to, but until then here’s the sparkly after.

Has anyone else tackled a makeover they never thought they had the skills to accomplish? How did it go?

Tuesday, September 3, 2013

Keep Calm and Blog On


If you invite me to a party I’ll there all dolled up, and in my favorite heels, but most importantly, I’ll be on time. Doctor appointments too.  I’m always on time for them, even though I know I will be kept sitting in the waiting room long after the actual time of my appointment. And I think my son was late for school once last year, and it was the week of my sister’s wedding when sleep was not a priority for anyone.

But technology? Oh hello, I am always late for that. My facebook page? Started it after making fun of my best friend for months that she had one. A tablet? I couldn’t understand why my husband wanted one so badly, but then when he got his iPad, it very quickly became my favorite toy to play with. I got my first smart phone in May 2013, (but in my defense, even I was ready for one long before, but I had to wait for an eternity for my upgrade.) Aaaand blogs. A party I’m only half late to. I’ve been reading blogs for years, learning from them, being inspired by them, getting some really great ideas, and talking about the authors as if they are my real life friends, but I put off making my own blog. Until today.
Some super smart person once said, better late than never, so hello internet. Welcome to my little glittery party.