Wednesday, September 3, 2014

Chatbooks: A Giveaway

Today is the first birthday of this little blog of mine!


Why yes, my first giveaway also had a Rapunzel gif, just keeping the tradition alive people.

To celebrate my big day I am teaming up with Chatbooks to bring you a fabulous giveaway!

Chatbooks is an app that organizes your Instagram photos into the cutest little 6x6 inch books. It. Is. Genius. I've already discussed my Instagram addiction, and this app makes it super easy to have your photos printed and organized. Each book has 60 pages, and is only $6 with free shipping. (You can't even print 60 pictures for that cheap on other websites!)


When you initially subscribe to Chatbooks, you will have all of your photos organized by date into books. You have the option to exclude photos, edit captions, and pick a cover photo. My favorite feature is that you can add contributors to your series. I have Daniel as a contributor, so now both of our Instagram accounts are being printed in one book series, and it keeps the pictures in the correct chronological order.  Once you make your first order, the app automatically adds your latest Instagrams to a new book, and when you reach sixty photos you will get an email reminder that you have three days to do any final edits, and then it automatically ships to you!


I love how my little stack of books look all piled up. You can choose a name for your book series, which is printed on the spine along with the volume number and date range.


Our stack is the perfect perch for our panda friend.

The people over at Chatbooks are amazing and really committed to you loving their product. The CEO himself will answer comments people leave on Instagram and Facebook. The quality of the photos are very good (it matches the quality of the original Instagram picture).

Chatbooks offers two other kinds of books. One is a custom photo book, which is not limited to your Instagram photos, and can use anything from your camera roll. You can add up to 300 pictures! The other is a "Chatbook Series," which syncs a group text to the app, and then any pictures that are shared to the group will get uploaded and a copy will be sent to each participant. This is a fun option for family members who share a lot of pictures. 


The app is currently only for iPhones, but the Android version is being released September 15th.

So now for the fun part... I am giving away a $30 credit to Chatbooks!  Just enter below, and good luck!


a Rafflecopter giveaway

Tuesday, September 2, 2014

After Labor Day

Another amazing summer is officially over, (even though it's a scorcher out today).  I really do love the fall, I just hate that it is followed by winter. I think I discuss the weather here a lot. Does that make me boring? (Note to self: don't be boring.)

This week is full of back to school craziness, last minute errands, and getting used to being at the bus stop at an earlier time than when I woke up last year.


Having two kids in two different schools is no joke.

I just wanted to tell you guys to make sure to check back her tomorrow for an awesome giveaway I am hosting!

Wednesday, August 20, 2014

Six

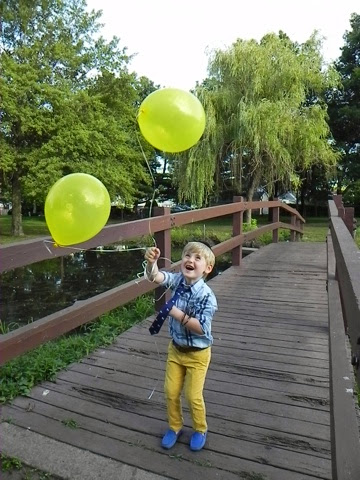
Moshe turned six today!

My charming, kind, lovable and handsome little man is quite grown up now.

We went out to the park with six balloons  to document just how big he's gotten. Only two balloons actually survived the trip, but without further ado, I present to you the birthday boy. 


Monday, August 18, 2014

Blueberries and Cake

Hello internetty people! I am back from my blogging summer break. The weather around here feels like it's fall already which means its beautiful out, but it's August still and I'm really not ready for summer to end. We have a packed schedule the next few weeks trying to squeeze in all the fun we can before school starts, but I am dusting off this little blog anyway. So hi again.

Last Sunday we drove out to a beautiful farm in Connecticut to pick blueberries.


Baby girl wanted to get in on the trying-to-take-an-artsy-picture action too.

I am about as city girl as they come, but it was so nice being on the farm and enjoying the near silence. (I have never heard anyone chew as loud as the guy picking munching berries next to us.)


We decided to go blueberry picking because they are easy for the kids to pick themselves, and even though you end up picking a lot, you don't get overwhelmed by them. I figure it's a lot harder to think of things to do with five pounds of apples (which I'm allergic to anyway) than the same weight in berries. And they take up less space too. Freezer space is considered prime real estate at my place.

Even though blueberry season is pretty much over, I have to share this recipe with you. I have no idea where I got it from, it was scribbled on a piece of paper in my recipe stash, so I can't give credit to the genius behind it. But seriously, go make this cake. And then invite ten of your closest friends over for a blueberry cake tea party because this cake is enormous.

Blueberry Bundt Cake
3 cups flour
2 cups sugar
3 teaspoons baking powder
2 tablespoons vanilla sugar
1 cup oil
1 cup orange juice
1 cup oil
4 eggs
18 oz. blueberries

Preheat oven to 350.

Mix all of the ingredients, besides the berries until combined. Carefully mix in the blueberries. Pour into a well greased bundt pan. (Pam Baking is a lifesaver).

Bake for 1 hour and 15 minutes.

So easy, and so good.

Did anyone pick any produce this summer? Or do you wait for fall to pick apples and pumpkins? Let me know below!

Thursday, July 31, 2014

Summer.

A post with just a few words and zero pictures puts me high up on the slacker scale. I wanted to say hi, and bye, just for now.

Summer is moving way too fast over here, and instead of any projects getting done, we've just been busy making the most of the season.

I'll be back soon internet people :) Thank you for stopping by here, I really do appreciate it!

Tuesday, July 22, 2014

Camp Girl


Another milestone on the way to growing up just got checked off. Lily started camp this week. I had planned to keep her home for another year, but due to various circumstances it became evident that now was the right time to send her out into the big wide world.

My little, social, funny, and outgoing girl is loving it.


There's nothing like having your baby girl running into your arms at the end of her day and giving you a kiss and telling you just how much she missed you. Knowing she had a great day and is being taken care of puts my mind at ease during the day when I am missing her too. And it is just too cute listen to her talk about "my friends."

There are of course major sleep benefits to camp as well.


Unless this happens first.


Wednesday, July 16, 2014

Mini Conversations

...Or conversations with the Minis. Because they are a pretty funny pair.


While watching a World Cup match:
Lily: "bad guy fall down!" 
(Don't know how she decided which team she was going for, I wasn't even watching, the game was on in a froyo shop while we were there.)

***

Moshe: "Mommy and Daddy got married a long time ago."
Lily: "Mickey and Minnie too!"


***

We used the parent swap line, so Daniel and I could both go on the Indiana Jones ride on our trip to Disneyland this summer. Moshe got to ride twice, so he prepared me for what was ahead.
Moshe: It's like the Winnie the Pooh ride, just a little more scarier."

Friday, July 11, 2014

Pull Up A Chair

So let's talk about chairs. 

I've been toying with the idea of adding a tiny "home office" area to our master bedroom in the very limited space that is available. I've been throwing a bunch of design ideas around in my head, but each idea has a ghost chair in it. 


I love the style of this chair, but I also love how it won't take up much visual space in the tiny area I am using. I would throw an Ikea sheepskin over it, because those are awesome (and cheap) and will be nice to cuddle up to while I do home officey things. Basically, this chair has been on my lust list for quite some time. Then I got to thinking about the spaces I drool over in design magazines and pictures on Pinterest and I realized that in each space I am drawn to the seating. Maybe I'm a couch/fab chair potato. I just really like me some nice chairs. 

One Kings Lane is a website that offers flash sales on amazing furniture and home decor. (You need to be a member to shop the sales, but you can use this link right here, to easily sign yourself up and let your inner shopaholic free!) They got in touch with me to let me know about a new decorating resource they are providing, an inspirational guide to help people when they are purchasing and styling chairs. I read through A Complete Guide to Modern Chairs and loved what they had written for a few reasons. I was a history nerd  major in college. I love history, and I love that this guide combined an old love, history, with my new love, home decor. And I loved that my beloved ghost chair was in it! It was really cool for me to read about the chair, and how it was made modern by making a classic French style chair in lucite. 

And then my little history loving brain exploded because I realized one of my favorite chairs ever is from my grandmother's house, and it's a French style chair as well. My grandmother has rocked at home decor for as long as I can remember. She has amazing furniture and has been the Queen of a well put together gallery wall, for years, ok decades, (sorry, Bobby) long before bloggers were writing "How to Make a Gallery Wall" posts. 


I decided it's pretty cool that my grandmother has this French style chair, and I will (hopefully soon) own the modern version of the chair. Hashtag twenty first century for the win. 

Another standout for me on One King's Lane guide is the Eames Lounge and Ottoman. Once upon a time I walked into my most stylish friend's bedroom and my jaw hit the floor. She had told me about a chair they had inherited from her husband's grandfather, and when I saw it I was all "OH EM GEE you have an actual Eames chair!"


A few months later  she found out it was not an authentic Eames chair. While there won't be any trip to The Antiques Roadshow, I still think it's cool to have a knock off that is actually a knock of from the mid-century as opposed to just any Eames knock off that was produced in 2013. She moved the chair to the playroom and I'm giving my girl extra bonus decor points because she styled this chair in such a modern fun way with bright pillows, and a chevron throw, because it is just awesome to mix old and new. (If brides are encouraged to do it, I say lets all do it, all the time.)

My little sister has been furnishing her first apartment in such a chic way. Instead of running out and buying a bunch of things just to fill the space, she has slowly been collecting pieces that she really loves. (Oh how I wish I had done this way back when.) When she pulled the trigger and bought an amazing chair I was insanely jealous. 


After reading A Complete Guide to Modern Chairs, I decided this chair has the design elements of Scandinavian/Danish Modern chairs. (Lily would be thrilled to know her aunt's chair design hails from the land of Elsa and Anna, or not really, but whatever people I'm writing this late at night.) And this also gets top marks in the styling department. 

I think using this guide can help you find design styles you may not have thought about previously. You can see which chairs designs are related to the ones you like, and then add pieces in to your collection that don't necessarily match, but complement each other. 

I'm going to go dream about the fab chairs I would be adding to my home, if I wasn't so tight on space now. Anyone have a particular style of chair that is high on their lust list? Let me know below! And let me know if you can find it in One King's Lane guide! Happy shopping!

p.s. This was NOT a sponsored post, and as always, all opinions are 100% my own. 


Tuesday, July 8, 2014

Hey It's Me Again


Hello internet people! I'm back. 

We took a family trip to California last week, and it was really amazing. 

I'm trying to get back into the swing of things, and get used to our new summer schedule, but I haven't quite yet managed it, due to post vacation exhaustion, or jet lag or whatever it is you want to call it.

Hopefully by the end of this week I'll have something new to write. Maybe a vacation recap, or maybe a DIY. Just wanted to let you know this blog hasn't gone anywhere. 

p.s. Palm trees are the best! Nothing screams vacation to me like a palm tree.

Wednesday, June 25, 2014

The Bar That Got Iggy

It's just so fancy now.


And I couldn't be happier to be finished with this never ending project, or more thrilled with how it turned out! I tend to talk too much, so I'm going to throw out the absolutely fab after picture, before I start the rambling wordy part of this post. Feast your eyes on this baby:


I know! Can you even believe that it's the same piece of furniture?


Last week I shared the O'verlays that I painted to match the bar. O'verlays can be used by themselves on any piece of furniture but I wanted to add a mirror, because who doesn't love a good piece of mirrored furniture? I had two mirrors cut at a local glass shop. I brought the O'verlay in with me and asked them to cut it to almost the same dimensions. The mirror was 1/8 inch smaller on each side, but I'll give you the details on that later.

I was super nervous to actually glue the mirror down, because getting things to be straight or even is not a strong point of mine. I decided to make a really big paper template to use. I just taped a bunch of sheets of paper together to make it the same size as one of the doors of the bar. I marked where the knobs go, and then measured where I wanted the mirror to go.


I held it up and used a level to make sure everything was straight, and then cut out where the mirror would be. I was left with a very thin strip of paper that I taped onto the door. I realize there is probably a lot of better ways to make sure you are attaching something straight, but I found this the easiest thing for me.

I attached the mirror using a heavy duty mirror adhesive and a caulk gun.


I then attached the O'verlay to the mirror using a clear silicone adhesive. The reflection of the back of the O'verlay shows in the mirror, which is why I had painted the back, and why it's important to use a clear adhesive.


Once the O'verlay was centered there was a slight overhang, because the mirror was cut just a drop smaller.

I used paintable white caulk to fill the gap. I know, so many (smelly) adhesives for one project. Make sure you are working in a well ventilated area and wear gloves!  Once it was dry painted it gray like the rest of the bar. This gave the bar a more seamless look as opposed to hey, I glued a bunch of things on top if and lets call it a day.


When the final paint touch ups (I did some parts of the door also which is why in the above picture the colors look a little wonky) were done it was time to put this baby back together. Oh happy day!


I am loving this corner of furniture makeovers! The bar really complements the breakfront. The time put into this piece was so worth it. I have a completely different piece of furniture for what it would cost in just shipping fees to buy something new.

Does anyone have any major summer projects on the horizon? Let me know below! I can't believe I have such a big project done, and it's not even July yet. But then again, I did kind of start this thing ten months ago.

If you want to read about this transformation from the beginning, here are the links.

A Tale of Two (ok, one) Paint Chips
This is What a Really Awesome Husband Looks Like
Airing Your Dirty...
That Terrible Middle Stage
Not Quite There Yet
Overly Smitten with O'verlays


Tuesday, June 24, 2014

Cookies and Crayons for Two

We're in that time between school and camp where some parents go crazy, and I get excited to have everyone home with me. Is that weird? I just like hanging with them.

After spending the majority of yesterday in bathing suits outside, we spent the last few hours of sunshine in our teeny kitchen entertaining ourselves. The first thing on our agenda was baking cookies. Baking is a great activity to do with your kids, I just don't like having the goodies around after, because then I end up eating them. I experimented with all of the different cookies in a mug recipe, but honestly, they were just gross. I then stumbled upon a recipe which makes only two cookies, and after trying it out, let me tell you, they are a real winner. The recipe is from No. 2 Pencil and it's actually by the woman who brought us the cookie in a mug.

Start off by preheating your oven to 350 degrees, and line a baking sheet with parchment paper. Then soften two tablespoons of butter until just beginning to get melty and blend with two firmly packed tablespoons of dark brown sugar, 1 tablespoon granulated sugar, a pinch of kosher salt, and 1/4 teaspoon pure vanilla extract.


Add an egg yolk, 1/4 teaspoon baking soda, and 1/4 cup all purpose flour and mix well.


Add three heaping tablespoons of chocolate chips. Take a 30 second break as your kids try to eat all of the chocolate chips. Then mix it all up.


Form the cookies into two balls (make sure they are the same size so no one accuses the other of having the bigger one) and place on baking sheet several inches apart.


Bake for 8-10 minutes until edges are golden brown. (I did it for 10 minutes and they were extremely soft and the kids ended up eating them with a spoon.) The original instructions say when you take them out of the oven, bang it down on the counter so the cookies deflate and get a lovely wrinkled appearance. I do it and nothing happens, but people live a little and bang those cookies anyway. 


Take half a minute to torture your kids and get a picture of them, when really all they want to be doing is eating those cookies.  


These make really big cookies, so you can probably get four out of them, and just bake them for a little shorter. I love how we had this great activity to do together, but there are no unhealthy leftovers sitting around tempting me.

When we finished our cookie activity we moved onto a little project I've wanted to do for a long time. This is something that is not new at all, but I wanted to give it a go, so we made shaped melted crayons. You know what I'm talking about, it's when you take all your old bits of crayons, and melt them together in a mold, and get a new fun crayon shape. We have a huge bag of crayons that gets dumped out every time someone is coloring. Now we have six fun flowers to keep track of instead. No complaints here.

I put out labeled plates and let Moshe and Lily sort the colors. 


We decided to mix the purple and pink crayons together, so Lily can have all her favorite colors in one place.


After you have your colors sorted you need to get all the wrappers off the crayons. After going through the plate of red crayons, I was highly annoyed it was such a pain in the you know what. I consulted la google and was told to soak the crayons to make the wrappers come off easier. Genius. I don't recommend doing this with a fresh mani.


When the wrappers are all off, chop the crayons and fill up whatever mold you are using. I used a silicone muffin pan. I think it's ruined and wouldn't use it for food anymore, so I'm donating it to the play kitchen. Keep that in mind, don't use your really good pans.


Bake at 250 degrees for around 15 minutes, or until the crayons are melted. After it's out of the oven, I put it into the freezer to help it harden. Pop out the crayons, and viola! New art supplies. I love the way the different colors show.


Anyone here doing anything fun with their kids? It seems like school has been out forever, even though it has only been a week, but I am loving it!